Example 1: BLAST Analysis
You now have a custom configured VM! Let's test our new GCP virtual machine with a protein sequence BLAST search. This is a shortened version from the full command-line BLAST tutorial, which ran the BLAST search on the Amazon AWS cloud platform. Check out the full tutorial for more details about the specific BLAST commands.
Run the following steps from the Google Cloud Shell terminal.
Step 1: Install BLAST
sudo apt-get update && sudo apt-get -y install python ncbi-blast+
- Check version:
blastp -version
blastp: 2.9.0+
Package: blast 2.9.0, build Sep 30 2019 01:57:31
Step 2: Set up file permissions and temporary directory
/mnt is a temporary file system that is large enough to run data analysis in, but is deleted when the VM is shut down.
sudo chmod a+rwxt /mnt
cd /mnt
Step 3: Download data
- Use the
curlcommand to download data files stored on an OSF repository:
curl -o mouse.1.protein.faa.gz -L https://osf.io/v6j9x/download
curl -o zebrafish.1.protein.faa.gz -L https://osf.io/68mgf/download
- Type
ls -lhtto list the downloaded files:

- Uncompress the files
gunzip *.faa.gz
Step 4: Blast search
- Make a smaller data subset
head -n 11 mouse.1.protein.faa > mm-first.faa
- Make a database to search query sequences against
makeblastdb -in zebrafish.1.protein.faa -dbtype prot
- Run protein
blastpsearch and save output
blastp -query mm-first.faa -db zebrafish.1.protein.faa -out mm-first.x.zebrafish.txt -outfmt 6
- Look at output results:
less mm-first.x.zebrafish.txt
Output file looks like:
YP_220550.1     NP_059331.1     69.010  313     97      0       4       316     10      322     1.24e-150       426
YP_220551.1     NP_059332.1     44.509  346     188     3       1       344     1       344     8.62e-92        279
YP_220551.1     NP_059341.1     24.540  163     112     3       112     263     231     393     5.15e-06        49.7
YP_220551.1     NP_059340.1     26.804  97      65      2       98      188     200     296     0.10    35.8
Type Q to go back to the terminal
Step 5: Configure Google toolkit
To save output files or download local files from your computer to the VM environment, we will use the Google Cloud Software Development Kit (SDK), which provides tools to securely access the GCP platform. The GCP VM already has the toolkit installed, but it needs to be configured and linked to your Google account. We will be using the gcloud and gsutil tools in this tutorial. More information about this process is available in the GCP support documentation on gcloud configuration and authorization steps.
In the VM terminal, enter:
gcloud init --console-only
- "Choose the account you would like to use to perform operations for this configuration": enter 2 to "Log in with a new account"
- "Do you want to continue (Y/n)?": enter Y
- Click on link under "Go to the following link in your browser". A new browser tab will open. Log in with the same Google account used to sign in to the GCP console.
- After sign in, a new page will open with a verification code. Copy this code and paste into the terminal after "Enter verification code:"
- "Pick cloud project to use": enter the number that corresponds to the option that lists your project ID
- "Do you want to configure a default Compute Region and Zone? (Y/n)?": enter N
The gcloud configuration should now be complete. Run the following command to check:
gcloud config configurations list
The output should list your GCP Google account email and project ID.
NAME     IS_ACTIVE  ACCOUNT          PROJECT            COMPUTE_DEFAULT_ZONE  COMPUTE_DEFAULT_REGION
default  True       <your account email>  <your project name>
Step 6: Create Google Storage bucket
The GCP uses Google Storage buckets as file repositories. We can copy files from the VM to the bucket so they can be downloaded to a local computer, or we can upload local files to the bucket that can be copied to the VM environment. We will practice both use cases in this tutorial.
Buckets can be managed from the graphical user interface (GUI) section of the GCP console or on the command line. We will create a bucket and move files on command line and then check them on the GUI. To ensure secure transfer of data to/from the cloud, we will use the gsutil tool.
- Make a bucket by using the
gsutil mbcommand. Google bucket paths always begin with "gs://". You must enter a unique name for your bucket (do not use spaces in the name). Follow along with the video and written steps below.
Usage:
gsutil mb gs://<your bucket name>
Example:
gsutil mb gs://forblast
Creating gs://forblast/...
- Bucket names, particularly auto-generated names, can get very long and complicated. To make it easier to type, we can create an alias for the bucket.
Usage:
export BUCKET="gs://<your bucket name>"
Example:
export BUCKET="gs://forblast"
There should be no output if alias assignment is successful. To check that the alias works, enter:
echo $BUCKET
The output for our example is:
gs://forblast
Step 7: Copy file to bucket 
- We will copy the blast output file to the bucket so it can be downloaded to your computer.
gsutil cp mm-first.x.zebrafish.txt $BUCKET
Copying file://mm-first.x.zebrafish.txt [Content-Type=text/plain]...
/ [1 files][  268.0 B/  268.0 B]
Operation completed over 1 objects/268.0 B.
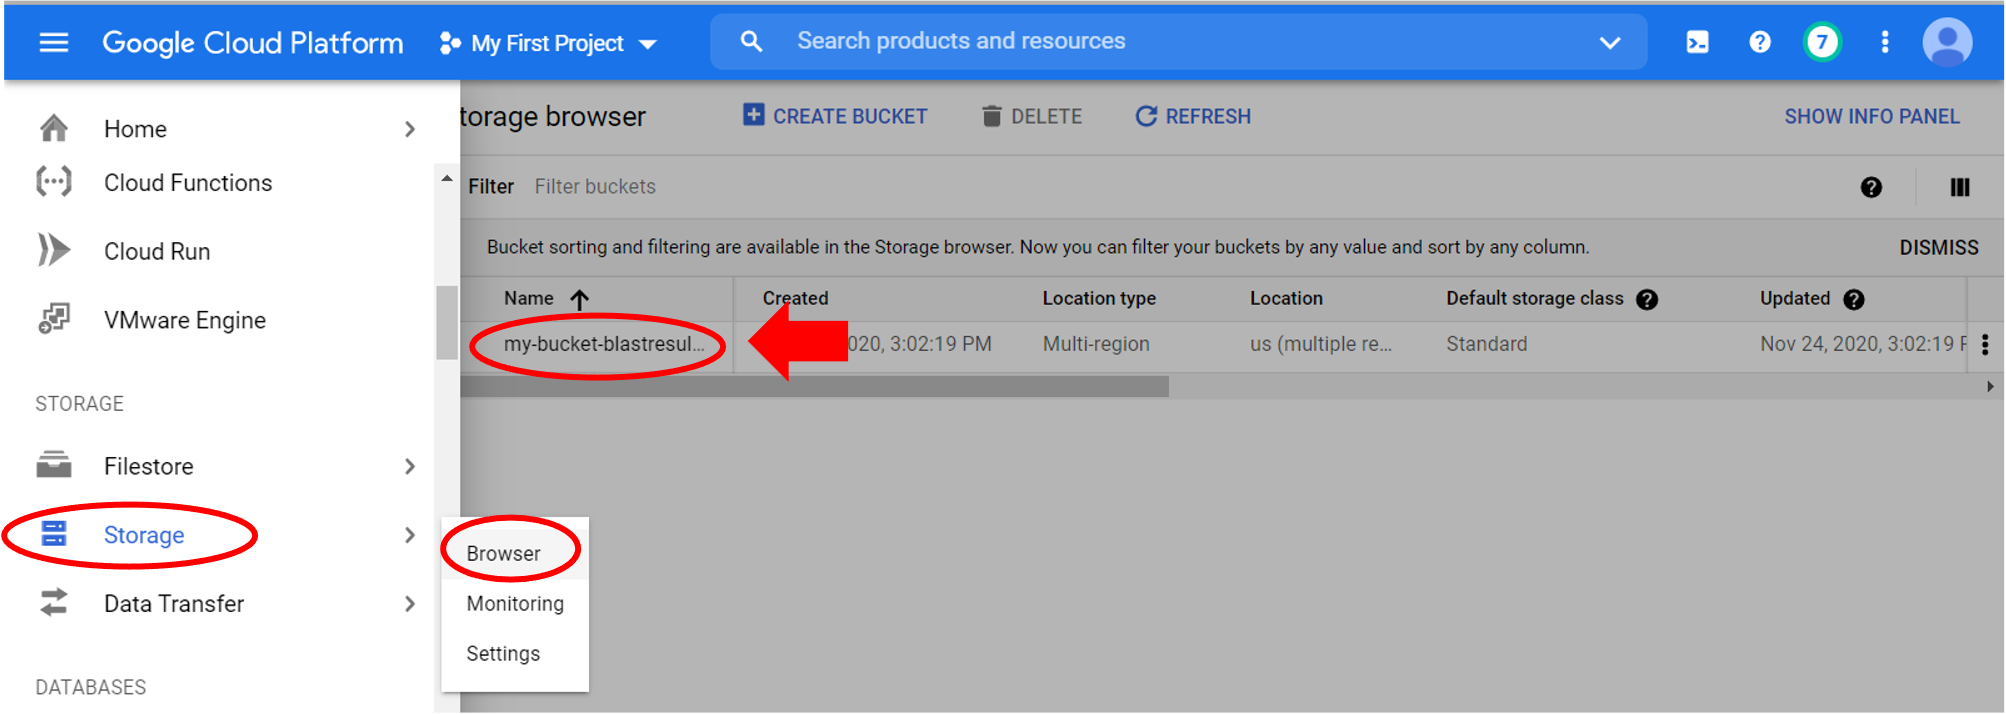
- Now go to the navigation menu, scroll down to Storage, and click Browser. You should see your bucket listed ("my-bucket-blastresults" in this example). Click on the bucket name.

- You should see the file we copied over. Check the box in the file row to download the file to your computer or delete the file. There is a Download button above the table to download multiple files, or the download arrow icon at the end of the file row to download individual files. You can also select files to Delete from the storage bucket.

Step 8: Upload files
Finally, you can upload files to the bucket to use in the VM. Follow along with the video and written steps below.
Click on Upload Files, choose file(s) to upload from your computer and click Open or drag and drop a file (shown in video). You should now see them in the bucket file list. To demonstrate, right-click or Ctrl click on this link - "testfile.txt" - and save the text file to your computer. Then upload it to the bucket:

Back in the VM terminal, use the gsutil cp command again to copy the file to the VM home directory. Replace the values below for file/folder name and the location to save them.
Usage:
# for 1 file
gsutil cp $BUCKET/<file name> <location to copy file to>

# for multiple files in a folder
# the -r is a flag that tells gsutil to recursively copy all specified files
# the * is a wildcard pattern that tells gsutil to copy all files in the folder
gsutil cp -r $BUCKET/<folder name>/* <location to copy files to>
Example:
- We copy the "testfile.txt" file from the Google bucket to the current directory location we're in at the terminal, which is represented by "./".
gsutil cp $BUCKET/testfile.txt ./
Copying gs://forblast/testfile.txt...
/ [1 files][    4.0 B/    4.0 B]
Operation completed over 1 objects/4.0 B.
Our VM terminal now has the test file! Check by typing ls -lht
total 134M
-rw-rw-r-- 1 <username> <username>  840 Nov 24 22:08 mm-first.faa
-rw-rw-r-- 1 <username> <username>  268 Nov 24 22:12 mm-first.x.zebrafish.txt
-rw-rw-r-- 1 <username> <username>  49M Nov 24 22:05 mouse.1.protein.faa
-rw-rw-r-- 1 <username> <username>    4 Nov 24 23:17 testfile.txt
-rw-rw-r-- 1 <username> <username>  41M Nov 24 22:05 zebrafish.1.protein.faa
-rw-rw-r-- 1 <username> <username> 6.8M Nov 24 22:08 zebrafish.1.protein.faa.phr
-rw-rw-r-- 1 <username> <username> 415K Nov 24 22:08 zebrafish.1.protein.faa.pin
-rw-rw-r-- 1 <username> <username>  37M Nov 24 22:08 zebrafish.1.protein.faa.psq
Step 9: Exit VM
To exit the VM:
- type "exit" to logout
- type "exit" to close the VM connection
This brings you back to the Google Cloud Shell terminal. Type "exit" one more time to completely close the shell panel.
Tip
Closing the VM does not stop the instance!
Step 10: Stop or delete the instance
When you're finished using the virtual machine, be sure to stop or delete it, otherwise it will continue to incur costs.
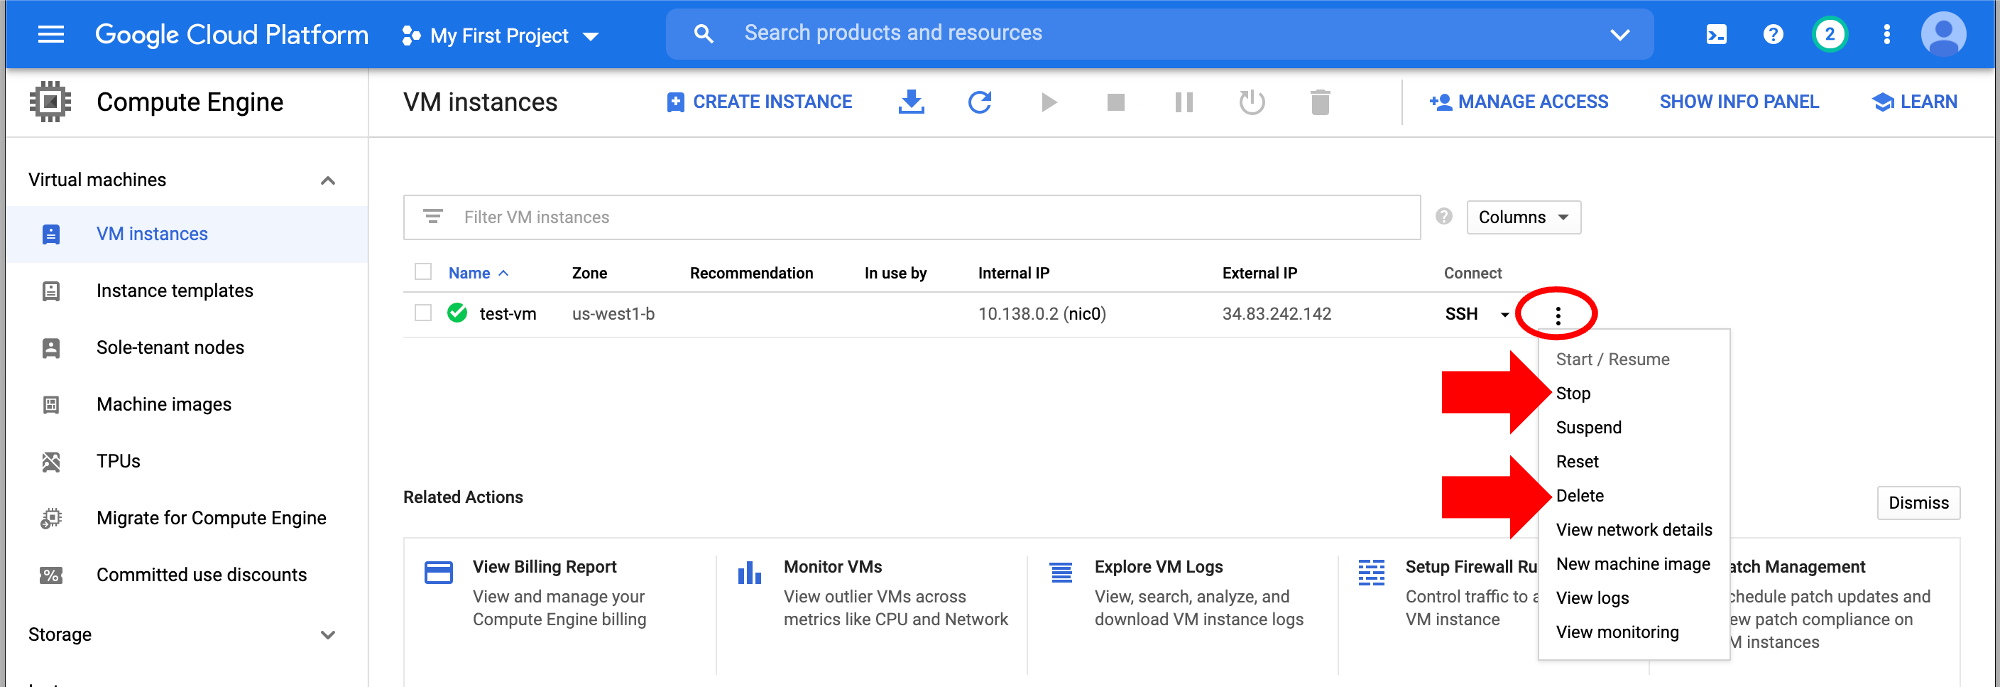
There are two options (click on the three vertical dots):
-
You can "Stop" the instance. This will pause the instance, so it's not running, but it will still incur storage costs. This is a good option if you want to come back to this instance (click "Start/Resume") without having to reconfigure and download files every time.
-
If you're completely done with the instance, you can "Delete" it. This will delete all files though, so download any files you want to keep!
