Running workflows in Terra
For this demo, we will show you how to run the same workflow as in the Genome-wide Association Study (GWAS) lesson, but on Terra instead of AWS.
Step 1: Download data
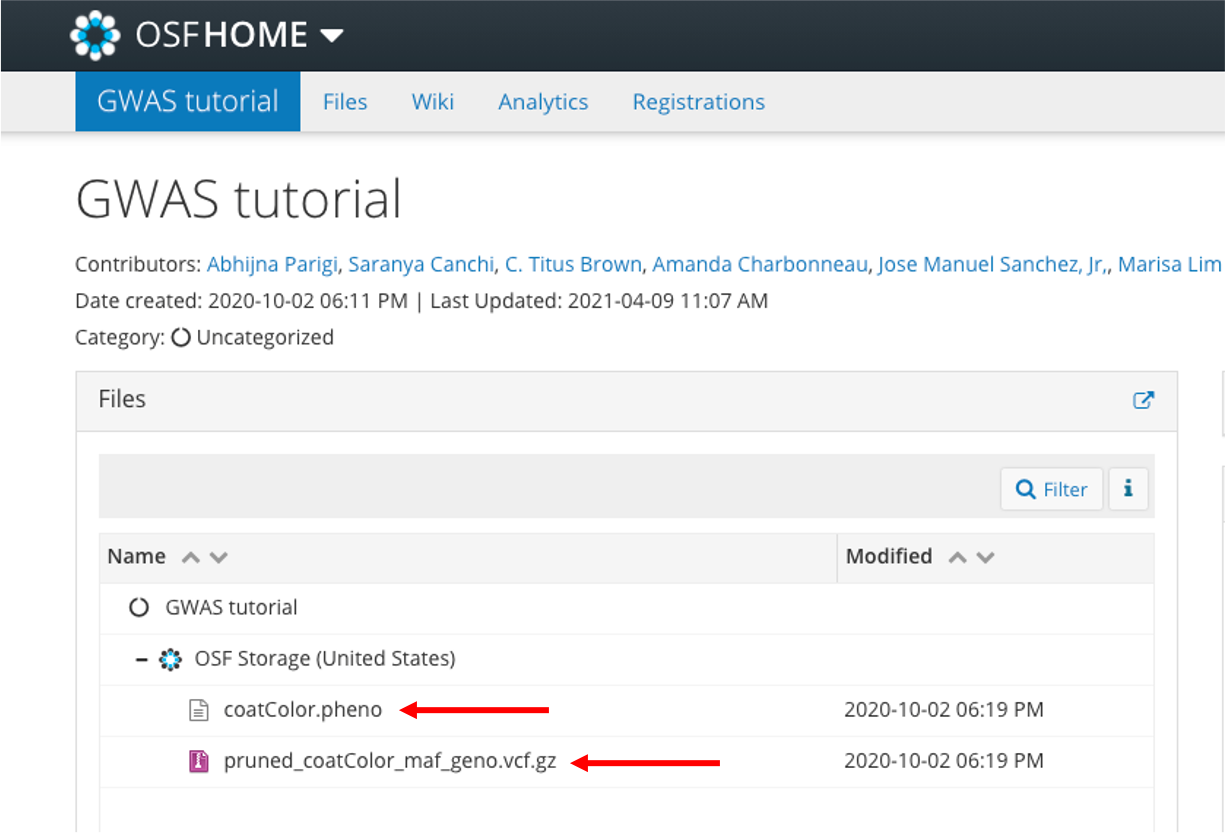
We are using 2 files for this example:
- a file that specifies dog coat color phenotype information ("coatColor.pheno")
- a variant call file ("pruned_coatColor_maf_geno.vcf.gz")
Download these files from our OSF repository: https://osf.io/gajtk/. Click on the file name:

Then click Download and save to your computer's Desktop:

Step 2: Import data to workspace
Open the workspace created in the previous section (home page for all workspaces. The demo data files (".pheno" and ".vcf.gz") are small enough to manually upload to our Terra workspace.
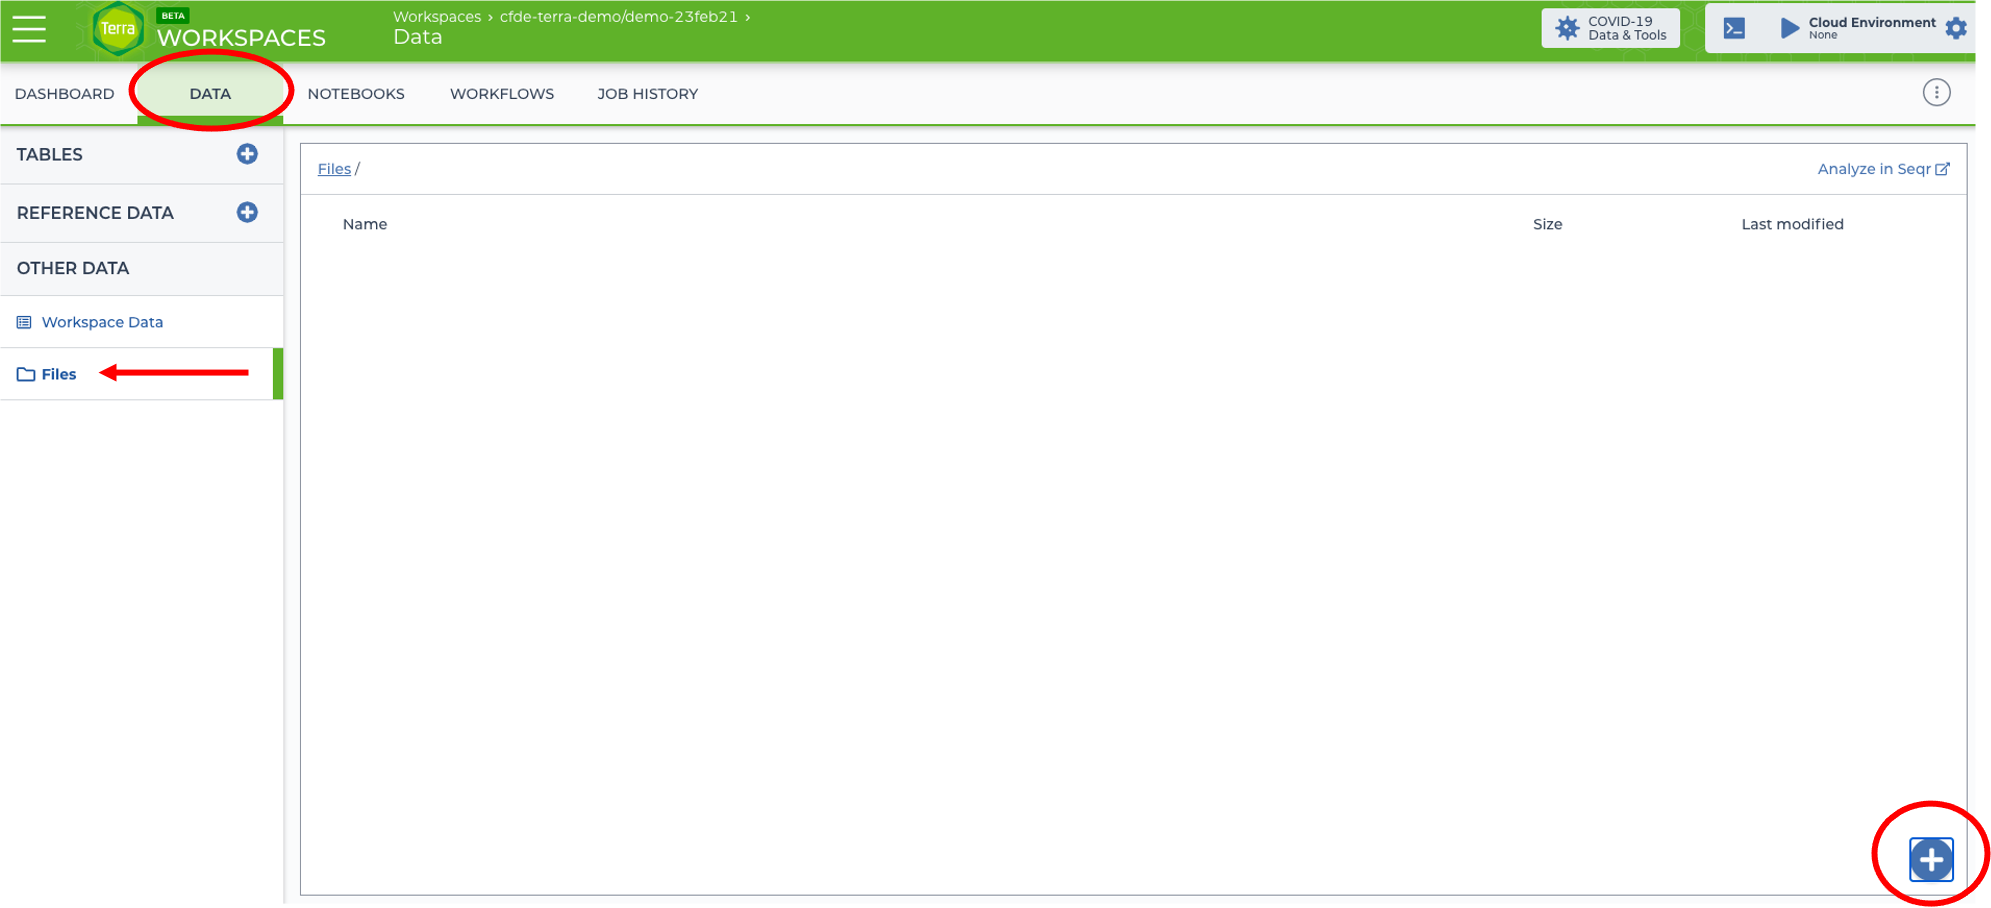
Go to the DATA tab, click Files, and then click the + sign to add 1 file at a time to the workspace.

It may take a few seconds for the vcf file to upload.
Tip
For larger datasets, you can upload files to the Terra workspace Google bucket location with the command line.
An example of this process is in the GCP lesson example.
If you want to move local (on laptop) data to the cloud, you need a local installation of gsutil (instructions for installation from GCP). Be sure to add gcloud to your system's PATH when asked during set up of the gsutil tool!
Use the storage bucket location already associated with a Terra workspace when you upload the files. For example, we have a workspace with this bucket name, "gs://fc-a2cdb170-5198-4a53-a631-86d22564d199", which we renamed with the alias, "mybucket".
# add alias
export mybucket="gs://fc-a2cdb170-5198-4a53-a631-86d22564d199"

# then we use gsutil to copy (cp) a file (file.txt) to the bucket
gsutil cp file.txt $mybucket

# alternatively, the -r flag recursively copies files from a directory to the bucket
gsutil cp -r lots_of_files $mybucket
After the files are in the bucket, they are accessible on Terra! Your files should be in the Data tab's Files page. To use the files in an analysis on Terra, you will then need to format the sample table section (next step below).
Step 3: Set up data table
We've uploaded data, but we still have to tell Terra how to reference the input files. This will make it possible to select inputs when we set up the workflow.
There are 2 ways to enter sample information into the data tables:
-
Upload a TSV file. We recommend for this lesson that you download this sample TSV file and then upload it to the "Import Table Data" box. In TABLES, click the + to "Import Table Data". Click the Drag or Click to select a .tsv file. Click UPLOAD.
-
As shown in the vidlet above, you can also copy/paste a tab-delimited table. However, please note that the tab delimiters are important and Terra will give a syntax error if it cannot parse the tabs. In TABLES, click the + to "Import Table Data". Switch to the TEXT IMPORT tab and copy/paste your sample table. Click UPLOAD.
For either approach, you must edit the file names with the pencil icon so they include the google bucket path, otherwise it's just a string of the file name with no location information (you'll know it's correct when the file name has a hyperlink and opens the download window). The bucket path is available from the Files tab by clicking on the uploaded file name. Copy the part that looks like: "gs://fc-a2cdb170-5198-4a53-a631-86d22564d199/coatColor.pheno" (the exact gs:// will be unique to your workspace).
Step 4: Run the workflow!
Find workflow
- Go to the WORKFLOWS tab, click the +, select the Broad Methods Repository
- The next page will ask you to sign in with a Google account. Click the Sign in with Google button and use your Terra login information to sign in. Accept terms of service.
- Under Public Methods, select GWAS-demo
- Click on Export to Workspace, select Use Blank Configuration, select your Terra workspace and click Export to Workspace
- Click Yes to return to Terra
Set up workflow
- Go to the DATA tab, check the box next to the row of data we uploaded. Click the 3 vertical dots and select Open with... a Workflow
- Specify the inputs as "this." and the file attribute name and click SAVE:
| Variable | Attribute |
|---|---|
| inputpheno | this.pheno |
| inputvcf | this.vcf |
| sample_name | this.sample_id |
- Specify the outputs by clicking Use defaults and SAVE
- Finally, click RUN ANALYSIS and LAUNCH
- The job will be added to the queue. Check the job manager to see if job is running.
Tip
This example workflow takes 10-15 minutes to complete. However, the job may sit in the queue for a while before starting (anywhere from a few minutes to a few hours). Since Terra currently does not notify you (i.e., via email) when a job successfully, starts, completes, or fails, be sure to check the job manager for status updates.
Step 5: Check outputs!
When the workflow completes successfully, the JOB HISTORY tab will show the job information and with the job status "Succeeded".
You can find more information about the Job history for each step of the workflow by clicking the "Job Manager" icon. The workflow outputs are available in the DATA tab. Click on the files to download the outputs. The final output of this workflow is a Manhattan plot. It will cost >$1 per file.
In the next lesson, we'll show you how we built the GWAS workflow.